Since its very first episode on September the 8th 1966, Star Trek Has been inspiring people of multiple generations, In its nearly 50 years of existence, the Universe in which Star Trek has been based has expanded dramatically; from multiple spin off shows and movies to books and games as well. As the Show went on, the world around us changed, and the technology behind creating the show changed as well.
As we all know throughout most of Star Treks past, real miniature models where created for filming, normally by ILM 'Industrial light and magic' (George Lucas company made for the creation of the Star Wars films) but as times and technologies have changed, so has Trek, eventually moving to CGI (computer generated images) Models. The first time ships from Star Trek where turned into a CGI based format was for computer games and a lot of book work, DS9 saw the biggest change from real miniatures to CGI during the war with the Dominion; this method was also carried out in Star Trek Voyager and Star Trek Enterprise.
As many of you know, I have a keen interest in 3D graphic modeling and have been building Star Trek ships for multiple purposes. At Current I am working on Star Trek Armada 3, Bridge Commander and just generic art for pictures which I am submitting for use in the Ships of the Line Calendar. Over my time working in the universe I have been asked many times, “how do you do what you do?” so I have decided to share some of my knowledge to you guys so you can see just what goes into creating a CGI Model and also the processes of getting it into a game.
Now before I get started, I feel it would be best if I explain some of the language that I will be using and also the software that I use.
Firstly, there is the program 3D Studio Max, this is where most of the work goes on, where a cube or a cylinder, plane or line will become something so much more, secondly we have Adobe Photoshop, this is where the ship will gets its skin, or be coloured in if you like. Normally the final stage before one of the ships gets into the game is the scripting, and for that most of us use a program called notepad++.
Within 3D Studio Max when building the Station I will be referring to a few tools to select different parts of my mesh *the ship being built* these consist of the following tools;
• Vertex
--
• Edge
--
• Border
--
• Polygon
--
• Element
--
• Scale & Uniform
--
• Weld/Target weld
• Bridge
As I use each tool I'll give a brief explanation on what it does.
This step changes depending on what I am building, for an example if it is a Cannon Ship (real from a show) I will find blueprints/schematics and as many reference pictures that I can, if its completely my own design I will sit there drawing different ideas as I go along, Now since this is a re-design of a station from Star Trek Armada 2, I've tried to get as much information on the station as I can, unfortunately this didn't turn out to well, screenshots from the game were lacking and there were no decent pictures online, so I will be working with just one picture that I was able to locate on Trekcore.
Again, keeping in mind this is a Cardassian station, I will be giving it the same reactor area as with Deep Space 9 and my Culture Station I have already built.
Here comes the long bit!
This section will consist mostly of pictures rather than text as it will make it easier for you guys to understand.
Basically I will start off with Cylinder with 36 segments,
The reason I am going for this is with the Station it will be easier to segment it into 120 degrees to make sure I have only 1/3 of the work to do. With the Basic Cylinder in place I converted it to a “Editable Poly” and removed the Top and the Bottom face of the cylinder so you can see right through it.
Now using the Border tool I will grab the top and bottoms and move them into the correct placement, every time I hold shift and pull the Cylinder it will create another set of 36 segments on top of where I last left off.
With this method I just grab, extrude and extend into the part I want, after just 3 minutes the reactor is done in just one piece.
I’m now at the point where I want to create the outside ring, keeping with the 36 segments I build a cylinder to the height I want with a Cap segments of 2, that means the top and the bottom will have 1 extra ring of vertex in them instead or just having the edge.
Using simple math I work out what I need for the arms, 36 segments divided into 3 is 12, so knowing that I set out selecting the Polygon mode, and selecting 4 faces followed by missing 8 faces and on and on until the ring process is complete, select extrude and move the faces into the position I need them, I then shrank them down and extruded again to give it the length ready to be moved downwards for the pylon.
Now for the 'Reactor Poles' that are around the reactor I simply created another Cylinder the same as the section above, and shape it again using the exact same method. At this point I have also changed the colour of the object to a grey to make it easier on my eyes, this isn't needed and is just something I tend to do by habit more than anything.
The next step is to unify the new cylinders to the main reactor housing, this is the 2nd worst part for me and is one of my pet hates, if the game didn't need it I wouldn't bother. Now what I mean by “unify” is exactly like the idea of the Romulans and Vulcans being one race again, as with The Next Generation Episode 'Unification' I take 6 reactor tubes, and the main reactor and turn it into 1 object, to do this its a bit more fiddly than the rest, it contains a lot of cutting and hand modeling by moving 'verts' to where they have to go and trying to get it to fit in the best way possible.
With that done, I move onto the main shaft, working from the reactor to the top of the station, again very simple, just moving the border of the reactor up using the exact same technique as I used to build the rest of it. Now to keep this report a little bit shorter, its basically all the same now until I hit the very top section of the station and also the docking ring, so after the next picture I will skip onto the next area.
As you can see by the Image above, I have added the first arms and turned the cylinder of the main shaft into more of a Hexagon, this was done by just 'welding' 'verts' into one an other, basically going from 9 verts in a curved area into only 3, 1 for the middle and 1 for each end and then the same on the other side as seen below, where the other pictures have been 'solids' this one is classed as a 'wire' or 'wireframe'
As for the arms I choose three of the hexagon sides and use the poly tool to select the 4 faces of the area and use a tool called insert, that gave me the ability to add an area of the face to which I extruded and moved outwards until I got the shape I wanted.
Using the exact techniques again to do the top section, I progressed with the trio of arms to give the station a different look, again on the opposite sides of the 3 main areas, I use the insert tool to create more faces which I extruded outwards again to get the extra arms, without taking you to far in depth to the point I personally wouldn't be able to explain it correctly, after a few hours of messing around this was the main look of the station. Again to keep the main shape of the station cylindrical like Deep Space Nine, I ended the top of the station (which will be the command center) as a cylinder.
With the main station structure finished, I wanted to move onto some form of a docking area. Again, as with all my Cardassian Structures I have made, I looked towards Deep Space Nine for inspiration, knowing that Terok Nor and Empok Nor where the exact same station just on different axes (as seen in the show) I thought that the Cardassians structures would all have similarities of some sort.
As this is the last part of the station I wanted to make sure no matter what view of the station you took, you would be able to tell it is related to DS9 in some fashion. even if you were not a trek fan and had seen one station, you would know they were from the same race.
Again, I started off with a cylinder, but since this one was going to be hollow I gave it a cap segment (Top and Bottom) of 2 instead of one. This would give it a set of extra 'polys/verts' thought the middle like a ring. Selecting just the middle I use the 'uniform and scale' tool to move the middle area to the correct size of what I am after.
Then I deleted the selected surfaces on both the top and bottom. After deleting the faces of the inside ring on both the top and bottom I selected the border of the inside, top and bottom, of the cylinder to which I just deleted, and used the 'Bridge' tool, bridging the gap from top to bottom instead of just top to top, which would only fill the hole again.
Using the tool again I have spoken about before I will not go into depth, but with some pulling in the right direction using the 'extrude' and 'uniform and scale' tool I made the ring look more like the docking ring of DS9, after the ring was the shape I wanted, I moved onto the Stations Arms that will connect the Docking ring to the main structure. Again I just selected the faces I wanted and extruded them to meet the main structure, selecting the middle face from each one on both the top and bottom and deleting them, and bridging the gaps so again it has some similarity to DS9.
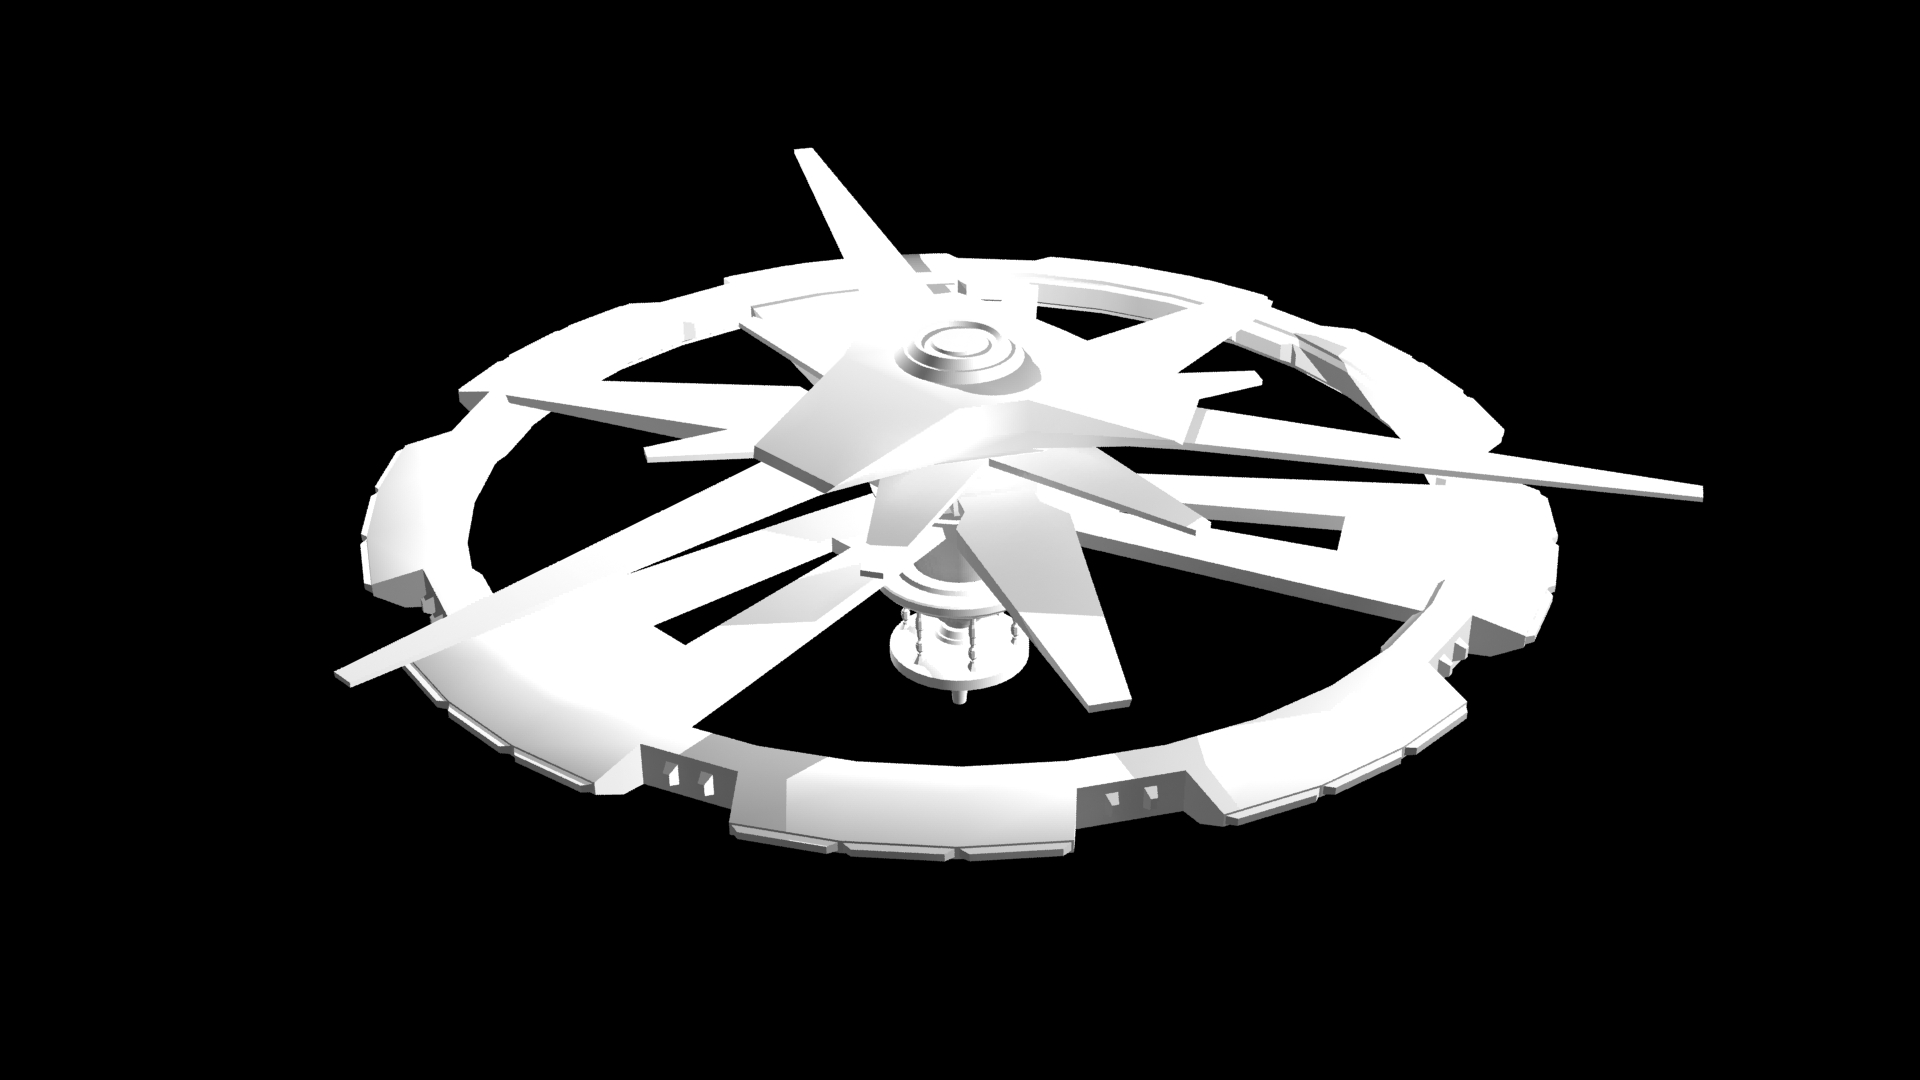
Now with the model complete it will be time for smoothing and unwrapping, but I will leave that for a second report. Here is the Mesh as she looks now. As you can see she has some similarities to the Original Design and DS9 but has my own twist on it.
Top
Bottom
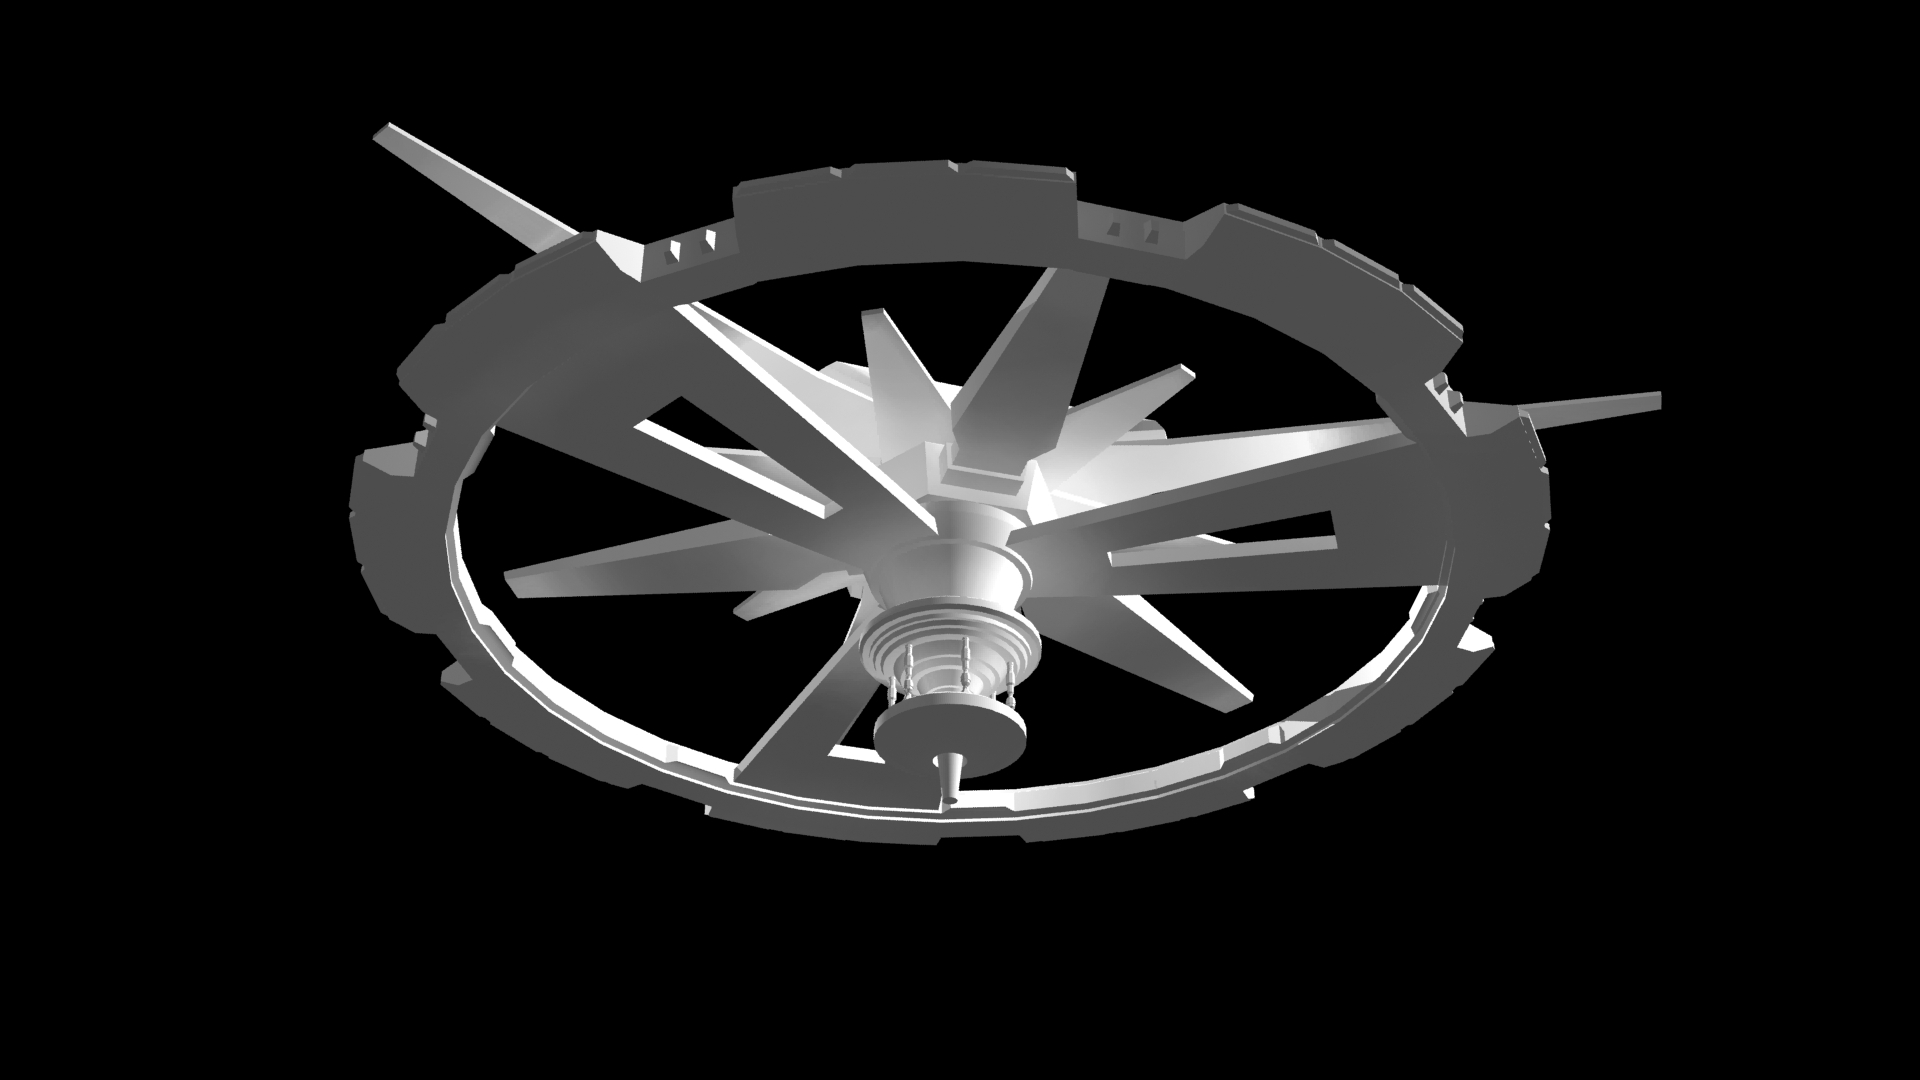
Bottom
DID YOU ENJOY THIS GUIDE TO MODELING? WOULD YOU LIKE TO SEE FNS PRODUCE MORE?
IF SO BE SURE TO COMMENT BELOW & VOTE ON THE POLL HERE.
WRITTEN BY PHOENIX
EDITED BY TORINTH - STEPHEN.HALL@UFPLANETS.COM
 This is amazing stuff! Since I'm trying to self-teach Sketchup, this helps me wrap my brain around concepts.